![]()
![]()
DPS945
Web Programming - Modern Apps
Denmark info Notes Weekly Resources Graded work Policies Standards Professors & addendum Code examples
© 2019 - Seneca School of ICT and Business Academy Aarhus
Web API design, create, deploy, and test, introduction
The theme of this document is to design and create a simple web service.
The web service will deliver data to requestors. The data will be materialized in the app (i.e. as JavaScript objects) and in a local database.
Confirm that your tooling is ready
Before writing and running the app, confirm that your computer’s tooling is ready. The College systems should be ready, but you may have to do some of these tasks if you want to use your own computer.
Remember the cautions in the welcome document:
We expect you to use a Unix-like system to do your work.
The College has hundreds of correctly-configured systems that are ready for use, so don’t waste course time doing personal configuration tasks (do that on your own time).
If your system does not yet have the Node.js app dev ecosystem
Install Node.js (which also installs npm). Verify its status:
node --version
npm --version
If your system does not have the developer tools
- Install git
- Install GitHub Desktop
- Install more browsers (assume that Safari is already there; add Chrome, Firefox, and Opera)
- Install Visual Studio Code (aka VS Code)
Configure VS Code
Do this only if it was just/recently installed: Configure “code .” functionality as described here.
Create a project to hold the web service
Using Terminal, navigate to the file system location that will hold the project. Create a new folder to hold the project.
Navigate into that folder. Create an empty server.js file. Create an empty index.html file. It’s also a good idea to create an empty README.md file.
Now, initialize the folder as a Node.js app:
npm init
Make sure you specify server.js as its entry point. Add your name as the author name, and add a description if you wish. The other settings can stay at the suggested default values.
Add Express.js:
npm install express
Now, edit the project.
code .
Open the server.js file for editing. Make it do something. For example:
console.log('Hello, world!');
Back in Terminal, run the app:
node server.js
It should respond with the console message, and then terminate.
Write a simple web server
Follow much of the technique used in previous web programming courses. Our goal is to create an app that will handle these requests:
- Get all
- Get one
- Add new
- Edit existing
- Delete item
This goal will work for a web service that handles ANY kind of data. Obviously, a more complex data model will have more request handlers, but they all share the same core design, and handle these five - or variants of these five - requests.
See the course’s code repository for ready-to-use (and edit) templates.
The core getting-started code looks something like the following. It assumes it is working with a “user” object that has a first name and a last name (as string data).
// Setup
const express = require("express");
const path = require("path");
const bodyParser = require('body-parser');
const app = express();
const HTTP_PORT = process.env.PORT || 8080;
// Or use some other port number that you like better

// Add support for incoming JSON entities
app.use(bodyParser.json());

// Deliver the app's home page to browser clients
app.get("/", (req,res) => {
    res.sendFile(path.join(__dirname, "/index.html"));
});

// Get all
app.get("/api/items", (req, res) => {
    res.json({message: "fetch all items"});
});

// Get one
app.get("/api/items/:itemId", (req, res) => {
    res.json({message: "get user with Id: " + req.params.itemId});
});

// Add new
app.post("/api/items", (req, res) => {
     res.json({message: "add a user item: " + req.body.firstName + " " + req.body.lastName});
});

// Edit existing
app.put("/api/items/:itemId", (req, res) => {
    res.json({message: "update user with Id: " + req.params.itemId + " to " + req.body.firstName + " " + req.body.lastName});
});

// Delete item
app.delete("/api/items/:itemId", (req, res) => {
     res.json({message: "delete user with Id: " + req.params.itemId});
});

// Resource not found (this should be at the end)
app.use((req, res) => {
  res.status(404).send("Resource not found");
});

// Tell the app to start listening for requests
app.listen(HTTP_PORT, () => {
    console.log("Ready to handle requests on port " + HTTP_PORT);
});
Edit server.js
Edit server.js so that it holds the code shown above.
Make a simple home page (HTML)
Edit index.html. Use the html:5 Emmet snippet to help with this task.
Run the app
In Terminal, run the app.
Open a browser, and navigate to the root (home page).
Open Postman, and interact with the resources that begin with /api/ (look at the code above).
This document introduces you to Postman, and has how-to getting started info.
Add some data (an array of objects)
You obviously noticed that the server’s functions were not really handling any data. The requests and responses were simple strings. We’ll change that now, and use real data.
We have to do two tasks:
- Add some data
- Edit the functions
Add simple string data
Let’s add a super-simple array of strings, for example the names of colours. Somewhere in the server.js file, create a variable to hold some data, something like this:
// Array of strings
var colours = [ 'Red', 'Green', 'Blue', 'Yellow', 'Aqua', 'Fuschia' ];
Change the “get all” function, and this time return the data.
What about the other functions? Yes, they need some work.
If we assume that itemId is the array element or index, then we can code a “get one”. For example, the function body looks like the following:
// Extract the item identifier
let itemId = req.params.itemId;
// Make sure it's valid
if (itemId > colours.length) {
  res.status(404).send("Resource not found");
} else {
  res.json(colours[itemId]);
}
Next, if we assume that we pass in a simple JSON object with one key-value pair (the key name is “colourName”, and the value is a string), then we can code an “add new”. For example, the function body looks like the following:
// Extract the incoming data
let newItem = req.body.colourName;
// Add another item to the array
colours.push(newItem);
// Return the result; RFC 7231 tells us that it must return HTTP status 201
res.status(201).json({message: "added " + newItem + " as itemID " + colours.length});
Work with a substantial amount of data
One of the new skills that you probably recently learned is the ability to generate and use a large amount of data. This skill is especially important for web programmers, because the result of the work we do is so visual in nature. It is always a good idea to use and show good solid credible data, instead of crappy placeholder data (e.g. abc, 123, foo, bar, etc.) that is so common in entry-level programming work.
Here, we will introduce you to, or remind you about, the Mockaroo service:
Need some mock data to test your app?
Mockaroo lets you generate up to 1,000 rows of realistic test data in CSV, JSON, SQL, and Excel formats.
Problem solved.
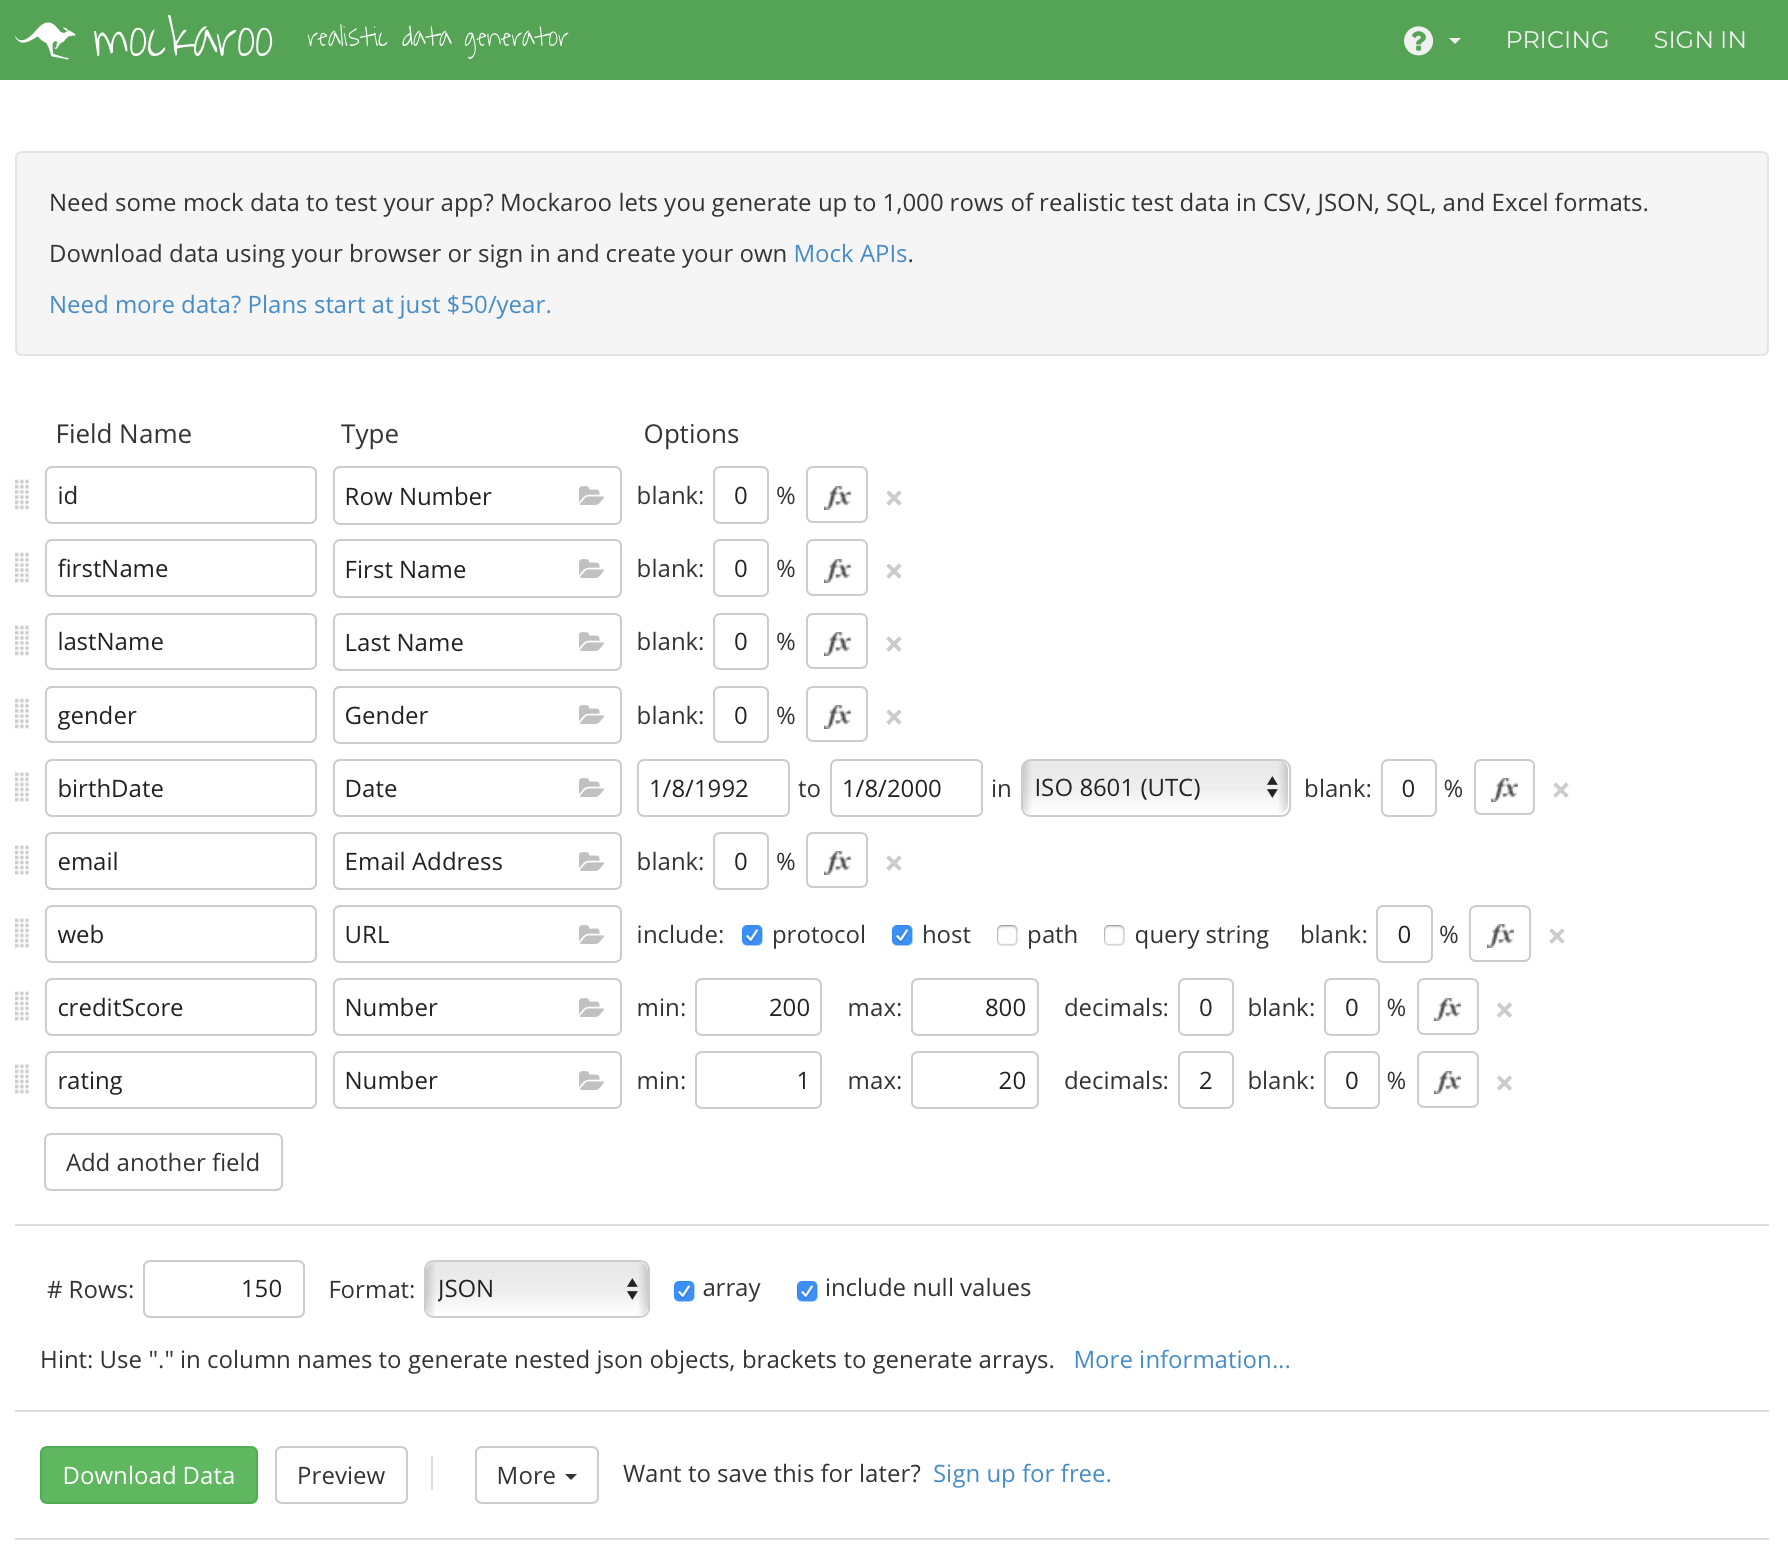
Generate some data. Make sure you configure enough fields to give you a rich variety of data. For the professor’s in-class demonstration example, here are a few notable choices we made:
- Birth date was within a range and in ISO 8601 format
- Credit score was an integer within a range
- Rating was a number within a range with two decimal places
- 150 rows were returned
- Data format was JSON
Here’s a screen capture. (Right-click and then open it in a new tab/window to see it full size.)
Use the data in your web service
The data comes to your system as a standard download. Open it for editing. Copy it.
In your code, similar to what you did above, assign the JSON as the value of a new variable.
var people = // your pasted JSON goes here
Don’t forget the statement’s trailing semicolon.
Now you have a rich body of data, with which you can do the standard get all, get one, add new, edit existing, and delete item tasks.
Update the code in the functions
Obviously, the code in the functions needs updating, to work with the new data.
Get all is easy to fix.
If you want sorted data - for example by last name then first name - more work needs to be done. The built-in JavaScript array sort() function mutates the existing array. Maybe that’s not such a good idea. Therefore, before sorting, copy the array to a new array, with something like this:
var c = data.map(p => p);
Then, the “c” array can be mutated, with something like this:
c.sort(function (a, b) {
    return a.lastName.localeCompare(b.lastName) ||
        a.firstName.localeCompare(b.firstName) || 0
});

// or, using arrow function syntax...
c.sort((a, b) => {
    return a.lastName.localeCompare(b.lastName) ||
        a.firstName.localeCompare(b.firstName) || 0
});
Finally, the sorted “c” array can be returned.
Do you want to sort an array of numbers?
The “compare” is an arithmetic subtraction compare.
Look at the MDN docs for more, but briefly:let numbers = [4, 2, 5, 1, 3]; numbers.sort((a, b) => a - b);
Or, if the numbers were in a property of an array of objects:
// assume the array "c" of people/person objects
// and we want to sort on credit score
c.sort((a, b) => a.creditScore - b.creditScore);
Get one is also relatively easy to fix.
Compared to the “colours” array above, where it was easy to “find” the value we wanted, this “people” array has objects as elements in the array. We want to support finding a matching identifier (i.e. the “id” field).
This needs a function (an arrow function, specifically). For example:
var o = data.find(p => p.id == itemId);
Then, if “o” is “undefined”, return HTTP 404. Otherwise return the object “o”.
You can do the others on your own (i.e. add new, edit existing, delete item). Doing this will remind you of your work with JavaScript arrays, and enhance those skills.
Looking for a more challenging task?
Try adding another function to handle a request for people with a high credit score (e.g. a creditScore value over 600). We can suggest the filter() function can help with that.
Try adding another function to return only the full names of the people objects. We suggest the map() function can help with that. (Bonus, sort the results.)
Try adding another function that will enable a find by last name (case insensitive).
Doing these additional tasks will prepare you for more interesting work with data and its transformations.
Next, working with a local database.
Work with a local database
The theme of this section of the document is to use a database to persist the web service’s data.
Before continuing, confirm that your computer’s tooling is ready. The College systems should be ready, but you may have to do some of these tasks if you want to use your own computer.
If your computer does not yet have the MongoDB engine etc.
MongoDB is a database engine, and therefore provides persistent storage for apps. The database engine can run on your own computer for development and testing purposes, and it obviously runs in a publicly-hosted server environment. The database data can be on your own computer, and it can be migrated or copied to the public host.
Of interest…
A server-based app that has a database (typically MongoDB) and Express.js added to a Node.js base, can be described as a DEN app, an acronym based on their initial letters.
You may be familiar with a MEAN app (or the “MEAN stack”). While it was convenient terminology, it was also a bit inaccurate, because there were always two apps involved - a client app (“A” for Angular), and a server app (“M” for MongoDB, “E” for Express.js, and “N” for Node.js).
For modern web service development, we have changed the “M” initial to a more-generic “D” for database.
You can run commands to learn whether MongoDB is installed on your computer:
# Is the database engine installed?
mongod --version

# Is the command shell installed?
mongo --version
If you need to, install the community version of MongoDB.
Need a how-to reminder?
MongoDB docs
Another reminder:
If you are using the Windows Subsystem for Linux (WSL) and therefore a Microsoft Store version of Linux (Ubuntu etc.), do the installation of MongoDB in Linux, and NOT in Windows.
Except for VS Code, *all” your dev tooling (Node.js etc., and MongoDB etc.) will be Linux apps.
MongoDB Compass (Community edition) is a graphical UI app that enables you as the developer to inspect and work with local (or hosted) MongoDB databases. If you need to, install it.
Prepare to use the Mongoose package
Mongoose is an object modeling tool for MongoDB. It is added to a Node.js + Express.js app that uses MongoDB as its persistent store. It improves and enhances the way our app uses the persistent store.
The Mongoose package can be added to an app’s project folder:
npm install mongoose
In the app, it looks like this:
// Ensure the app can use it
// (this code is typically in a
// data model manager source code file)
const mongoose = require('mongoose');

// You must define entity schemas that describe
// the shape of the app's entities
// Then, it must connect to the database
Web service and one-entity local database
In this section of the document, we will:
- use the locally-installed MongoDB engine
- generate data with Mockaroo
- import the data into MongoDB
- add database-related code to the app
- run the database engine
- run the app, and interact with it using Postman
Ensure that your tooling is ready, and that your hosted service accounts are ready.
Create a folder (directory) to hold the database.
Suggestion:
Create the folder as a peer to your app’s folder.
Maybe namedcoursedbweek1.
Open a new Terminal window to do this, because you will need your other/existing Terminal window to run more commands.
Recommendation, or pro tip:
Don’t use the VS Code terminal panel for typical tasks. It’s too confining.
Instead, open and use multiple Terminal windows.
Attempt to start and run the database engine.
mongod --dbpath ./coursedbweek1
This task should result in many console messages, and one of the later or final messages will tell you that it’s ready; something like this:
2019-06-13T10:45:49.380-0500 I NETWORK [initandlisten] waiting for connections on port 27017
MongoDB import
Generate some data, using the Mockaroo service. If you are happy with the data you generated (and downloaded) earlier, you can use the same configuration, EXCEPT that you do NOT need an “id” field. (The database engine assigns an object identifier, and its field name is “_id”.)
To repeat, and to avoid confusion, regenerate the data from the Mockaroo service, and make sure you do NOT have an “id” field.
Then, move or copy the downloaded data to the same folder that holds your app’s project folder and the database folder.
Run this command while in the same folder as your generated data file.
mongoimport --db coursedbweek1 --collection person --file mockdatav2.json --jsonArray
If successful, it will respond with something like this:
2019-06-13T11:06:27.389-0500	connected to: localhost
2019-06-13T11:06:27.460-0500	imported 200 documents
You can use the MongoDB shell or the MongoDB Compass tool to query the database. The following are MongoDB shell commands after running mongo.
Confirm that your database is on the list of known databases:
> show dbs
Use or set the context to your database:
> use coursedbweek1
What collections are in this database?
> show collections
Run a query (assuming “person” is one of the collections in the database):
> db.person.find()
For now, you can exit the shell (Ctrl+C) and shut down the database engine (also Ctrl+C).
Add database-related code to the app
For this task, do not use the app(s) that were created earlier. Instead…
Create a new project (new folder, empty code files, npm init etc.).
The project should have three (3) JavaScript source code files:
server.js- the app’s entry pointmanager.js- data service tasks (get, add, etc.)schema-XXX.js- Mongoose “schema” code, to define the shape of the entities; replace the “XXX” with a suitable entity name
Remember…
Create and configure anindex.htmlsource code file, so that the app has a nice home/landing page.
Install Express.js and Mongoose into the project.
Open the code example before continuing. Your professor will explain the code in class.
So far, it can handle requests for two resources:
- All persons
- One specific person, using its (MongoDB) identifier
Start the database engine
Almost ready… Start the database engine, so that it is listening, and ready to handle calls from the app:
mongod --dbpath ./coursedbweek1
Run the app, and interact with it using Postman
Now we’re ready: Start the app. Then, interact with it using Postman.
When you are satisfied, shut down the app, and shut down the database engine.